Showing posts with label food. Show all posts

Thursday, August 5, 2010

Chicken Piccata...OMG!

Hi Nesters!

Last night, I made the final dish on this week's list of meals inspired by Lyndsey's blog, The Tiny Skillet.

I don't know what I was expecting chicken piccata to taste like but as my post title states...OMG! I guess I never really knew what the meaning of "piccata" was (hellooo, I read the list of ingredients, right?). Well now I do. And is it ever scrumptious!

To offset the tangy tasty of the piccata sauce, I used a raspberry vinaigrette on the salad. Everyone loved this dish and it's getting a spot in my regular meal rotation. But even if no one else ended up liking it, I would have cooked it for myself anyway--I love it that much. Thank you, Lyndsey.

From wisegeek.com:

"Chicken piccata or veal piccata is a traditional Italian dish, very often available in Italian restaurants. Piccata translates to piquant or piquancy, which in one definition means tart or zesty. Chicken piccata does have a tart sauce, with traditional additions of lemon juice, white wine and capers. It’s also quite easy to prepare, especially in small batches."

Photobucket


Ingredients:

  • 3 tablespoons butter, divided
  • 1 tablespoon flour
  • 1 teaspoon seasoned salt
  • large zip-top bag
  • 4 chicken breast cutlets (about 1 lb)
  • 1/4 cup water
  • 1 tablespoon capers
  • juice of 1/2 lemon
  • 3 tablespoons white wine (optional)
Directions right off of Lyndsey's blog post:

Season cutlets with sea salt and pepper, place flour and seasoned salt in zip-top bag; shake to mix. Add chicken, seal tightly and shake to lightly dust each piece.

Preheat large sauté pan on medium-high 2-3 minutes. Add 2 tablespoons of the butter; swirl to coat. Add chicken; cook 5 minutes, without turning, or until golden.


Turn chicken, add wine, then stir in capers, juice of one-half lemon (about 1 tablespoon), remaining 1 tablespoon butter, and 1/4 cup water. Cook 2-3 minutes or until sauce begins to thicken and internal temperature of chicken reaches 165°F.

Saturday, July 31, 2010

Salmon Patties with Red Lobster Cheddar Bay Bisuits (my version)

Hi everyone!

Here's yet another installment in my effort this week to try something new each night for dinner with recipes inspired by The Tiny Skillet.

I've never made salmon patties before but there have been a couple of recipes I've wanted to try. I combined elements from both recipes and added some ideas of my own to arrive at a brand new creation. I've been making my version of Red Lobster's Cheddar Bay Biscuits since 2004 so I stuck with what I like.

Salmon Patties

  • 1 14 1/2-oz can salmon
  • 1/4 fresh minced onion
  • 2 Tbs butter
  • 2/3 cup fine dry bread crumbs
  • 3 cups egg beaters
  • 1 tsp lemon juice
  • 1 tsp sugar
  • 2 tsps Worcestershire Sauce
  • 1 tsp dry mustard
  • 1/8 tsp pepper
  • Oil or butter for frying

Finely chop 1/4 cup of onion and saute in a saucepan containing 2 tablespoons butter over medium heat until tender.

Open up can of salmon and drain off the liquid. Dump it into a small bowl (I removed all the bones, but you don't have to--you can just mash them all up into the mix) and mash well with a fork.

In a medium mixing bowl combine breadcrumbs, eggbeaters, lemon juice, sugar, Worcestershire Sauce, dry mustard and pepper. Let sit a minute or two until breadcrumbs have soaked up most of the liquid. Add salmon and onions and combine well.

Heat 2 tablespoons oil in a frying pan over medium heat. Shape salmon mixture into 10 small patties and fry for approximately 3 minutes per side or until golden brown. I cook 4 or 5 patties at a time depending on their size. Drain on a plate lined with paper towels.

Makes 8 to 10 patties.

Photobucket


Red Lobster Cheddar Bay Biscuits (my version)

  • 2 1/2 cups Bisquick baking mix
  • 1 cup milk
  • 1 cup cheddar cheese -- shredded
  • 1/4 cup margarine or butter -- melted
  • 1/4 teaspoon garlic powder (divided in half)
  • 1/4 teaspoon dried Italian seasonings


Preheat oven to 400 degrees.

Combine baking mix, milk, cheese and 1/8 tsp garlic powder until soft dough forms.

Drop dough by 1/4 cups full (I spray the inside of the measuring cup with non-stick spray for easy release of the dough) onto ungreased cookie sheet.

Combine the melted butter, 1/8 tsp garlic powder and Italian seasonings. Brush the mixture over the tops of each biscuit (save leftover butter mixture for serving).

Bake 14 minutes or until golden brown. Serve warm.

Makes 8 large biscuits.

**************************************

Here's how this meal was received:

Jason really liked both the salmon patties and the biscuits.

Sierra didn't like the salmon patties but she ate one (I made her--mwahahaha I'm evil mommy). She thought the biscuits were just okay so she added honey. Um, honey on a garlic cheddar biscuit? Riiiight.

Cameron thought the salmon patties were okay and he ate one without complaining. He did the honey on the biscuit thing after seeing Sierra do it. You'd think my kids have never had a dinner roll without honey on it. Wait, maybe they haven't.

Okay, on to the rest of the review. I thought the salmon patties were okay but not great. It's not that they tasted bad or anything. I think I'm just not a salmon patty kind of girl. I always wanted to make them and now I have. I really need to think something is great in order for me to want to cook it again so the salmon patties will not be making an encore appearance at our house.

Of course, I looove the biscuits. I started making them in 2004 when I was pregnant with Cameron. I craved Red Lobster's fried catfish and cheddar bay biscuits throughout my pregnancy even though I'd only eaten at Red Lobster once in my life years before. The thought of them must have really stuck with me. Luckily, there is a Red Lobster near our house so I would just call ahead and take them "to go." When I would arrive, they'd see I was pregnant and ask if I'd like a couple of extra biscuits. Uh, yeah! It started getting a bit costly so I just started making the catfish and biscuits myself.

All in all, it was a good learning experience.

Robyn

P.S. Thank you again, Heather for the lovely family heirloom dishes.

Friday, July 30, 2010

Feta & Basil Stuffed Chicken Breasts Wrapped in Bacon

Hi Nesters!

If you read my recent blog post "Easy Chicken Enchiladas Verde," you know that I perused my friend Lyndsey's blog The Tiny Skillet for inspiration in my meal planning for the week. I didn't have to cook dinner last night because I met a friend for dinner at Daily Grill. Turns out, Jason fed the kids pancakes for dinner so they were pretty happy.

Drawing inspiration from Lyndsey's Spinach and Feta Stuffed Chicken Breast, tonight I made feta and basil stuffed chicken breasts wrapped in bacon.

Here's a photo of the finished product to whet your appetite.


The kids get milk. Mommy gets wine!

Photobucket

Here's my recipe:

  • 6 chicken breast halves
  • 6 slices of bacon
  • 3/4 cup reduced fat feta cheese
  • 1/4 cup chopped basil
  • seasoning (I used Montreal Chicken seasoning)
Preheat oven to 350 degrees. Lightly grease a 9x13 baking dish.

Chop basil and set aside.

Pretty organic basil from my garden.

Photobucket

Photobucket

One at a time, place chicken breast halves in between two pieces of plastic wrap. Using the flat side of a meat tenderizing mallet, pound the chicken into submission (or to 1/4" thickness).

Photobucket

Lay the chicken breast out flat and fill with feta and basil. Roll up chicken breast. Wrap one whole slice of bacon around each breast and secure with toothpicks.

Photobucket

Photobucket

Place the bacon-wrapped chicken breast into the baking dish and sprinkle with seasoning.

Photobucket

Bake for 15 minutes at 350 degrees. Then turn your oven to broil and cook a few minutes more till bacon gets crispy.

Photobucket

I served it with a salad of mixed greens, candied pecans , dried cranberries and bleu cheese crumbles. The family loved it and decided it's a keeper--yay!

Photobucket

Thanks for stopping by!

Robyn

Wednesday, July 28, 2010

Easy Chicken Enchiladas Verde

Hi Nesters!

To avoid running back and forth to the grocery store all week or worse, standing in front of my open fridge at 5:00 p.m. wondering what I'm going to make for dinner, I try to plan 4 or 5 dinner menus at a time and then do the shopping for all of them in one trip. I'm in an experimental mood this week and wanted to try some recipes I've never made before (hoping to add a few new dishes to my cooking repertoire). So earlier today, I flew over to my friend Lyndsey's blog The Tiny Skillet for inspiration. Her Chicken Enchiladas immediately caught my eye so I decided that would be for dinner tonight. I changed a few things around to suit my taste and cooking style but basically it's the same idea. The family (which includes a 6 y/o son and very picky 13 y/o daughter) loved it! Here is my recipe:

Easy Chicken Enchiladas Verde

10 corn tortillas
1 28-oz. can green enchilada sauce*
1 lb. white meat chicken* (I used chicken tenders because they were considerably less expensive than breasts)
salt/pepper/garlic powder
1 1/2 cups shredded Monterey jack cheese
2 cups shredded Mexican blend shredded cheese
vegetable oil

*You can use leftover chicken and make homemade green sauce if you like. But I didn't have any leftover chicken and I wanted to use canned sauce so it would be fast and easy.

  • Preheat oven to 350 degrees. Thoroughly coat a 9x13 glass baking dish with non-stick spray (makes cleanup super easy).

  • Place uncooked white meat chicken in a stock pot. Fill pot with water just enough to cover chicken. Sprinkle salt, pepper and garlic salt over the chicken. This seasons the chicken so it doesn't taste bland inside the enchiladas. Boil over high heat until the chicken is cooked all the way through and shreds easily with a fork.

  • While chicken is cooking, heat some vegetable oil (about 1/2" deep) in a skillet over medium high heat. One at a time, dip the corn tortillas in the hot oil for approximately 20 seconds. This is just enough time to soften the tortillas for rolling, but not enough to make it crispy. Set the tortillas to drain on a plate lined with paper towels (layer towels in between tortillas.

  • Remove cooked chicken from water and shred. I use two forks to shred chicken but you can use your fingers if you like.

  • Assembly: Pour enough green enchilada sauce in the baking dish to cover the bottom. One at a time, put shredded chicken down the center of each tortilla. Top with Monterey jack cheese. Roll up and place seam side down into the baking dish. After all filled tortillas are in the baking dish, pour the remaining green enchilada sauce over the top of all the enchiladas. Top with the 2 cups Mexican blend cheese.

  • Bake in preheated oven for 20-25 minutes. Serve with sour cream.

Photobucket


Photobucket


Don't forget to check back to see what I make next!

Robyn

Tuesday, January 5, 2010

Black Bean Brownies


I joined Weight Watchers about 4 weeks ago to get rid of those pesky few extra pounds that don't seem to want to leave with my regular diet and exercise routine. I attend the weekly meetings and find lots of inspiration and new ideas there. The most unusual cooking tip I got at my last meeting was Black Bean Brownies. My leader, Teri, assured me that she had made them herself and they were very tasty. And, at only 110 calories and 1/2 gram of fat per brownie (compared to 190 calories and 9 grams of fat for the regular version), they are figure-friendly as well. They are also a fairly decent source of fiber (the beans added 5 grams of fiber for the entire batch).

Here's what you do:

1 box brownie mix (I used Betty Crocker Fudge Brownie mix)
1 can black beans

  • Rinse/drain the beans. Put the beans back into the can and then fill it with water to the same level the liquid was at when you first opened the can. This is supposed to remove some of the "gas factor" from the beans.
  • Puree the heck out of the beans/water in a blender until there are virtually no bits or chunks left. I tried using my Kitchen-Aid mixer first but it didn't get them as smooth as they needed to be so I finished them off in my blender.
  • Mix the pureed beans with the powdered brownie mix and bake according to the package directions. I used a 9x13 pan and they came out about 1/2 thick and fairly dense. This was a good thing because we prefer our brownies more rich and moist and less cake-like.

There was no trace of bean smell or taste in either the batter (yes, I had to lick the batter just to check) or the finished brownies. Cameron ate 4 of them and said, "These are the best brownies ever!" And no, I did not tell him or Sierra that they were made with beans. I did tell Jason about the beans and he said they were delicious and he would never have known that there was anything different about them.

I hope you decide to try them for yourself. I think you'll be pleasantly surprised.


Photobucket

Monday, December 7, 2009

Martha Monday: Iced Applesauce Oatmeal Cookies

This week's Martha Monday project (selected by yours truly) was Iced Applesauce Oatmeal Cookies. I wouldn't say I'm a "fan" of oatmeal cookies (I'm really a chocolate chip girl) but I wanted to make a cookie that I don't make every day, was relatively easy, didn't require waiting time for dough to chill, would travel well to/from a cookie exchange, and that my kids would like. Oh yeah, tasting good would be a good thing also. This cookie fits all those criteria. Yay! The maple sugar frosting was the clencher.

The only changes I made to the recipe was that I subbed 1/4 cup of the regular flour with whole wheat flour (I like to sneak in a little extra fiber for the family wherever I can), and I used regular unsweetened applesauce instead of chunky (grocery store didn't have it). Everyone in the family loved them without frosting (they couldn't wait for them to cool before they tried em) and with frosting. But they definitely preferred the frosted version. So do you think they're Santa worthy...I do!


Photobucket

Friday, August 28, 2009

Martha Monday - "Roast Chicken with Plums" . . . better late than never!


The idea behind Martha Mondays is that anyone who would like to participate in the weekly challenge could do so either on Monday, Tuesday or really whenever they can get around to it and then they can post their results on their blog or on the Martha Monday web site. But the cool thing about actually doing it on Monday is that you get that warm fuzzy feeling knowing that you and a bunch of other fellow "Martha Monday-ers" are doing the same thing on the same day. Frankly, I was just grateful to get this week's challenge in before the week was over. Here's how my "Roast Chicken with Plums" turned out. . .


Here are the plums in their pre-cooked state covered in honey. I couldn't find small plums so I bought 6 regular sized plums and pitted and quartered them prior to roasting.

The finished dish. The dark striping across the skin is from the honey I drizzled over it prior to roasting.

All pretty and plated up next to a dried cranberry and candied pecan-garnished salad.

And the piste de résistance... the plums were the hit of the dinner!

Sunday, August 23, 2009

What's for breakfast . . . Pigs-in-a-Blanket Dippers!

I made this simple yummy breakfast for the kids this morning.
  • 1 package (8 links) Farmer John original pork sausage links; cooked according to pkg directions
  • 1 tube refrigerator reduced fat crescent rolls (no, this is not a low-fat recipe)
  • Roll up 1 cooked sausage link inside 1 triangle of crescent dough
  • Bake at 375 degrees for 10 minutes
  • Serve with warm maple syrup or honey for dipping

Tuesday, August 11, 2009

Martha Mondays: Grilled Vanilla Peaches


This was the first assignment for Martha Mondays. I used white peaches (I thought I was buying yellow ones) for my recipe. They taste just as good but are not quite as pretty. I love the look of contrasting foods. But once the peaches were covered in ooey gooey cinnamon sauce, there was a good measure of color contrast there with the vanilla ice cream.

It was in the high 90's here today around dinner time so I decided to alter the recipe a bit and "grilled" my peaches in the oven instead of on the barbeque. They were so tastey. Cameron had two helpings. Sierra thought they were a little sweet for her taste. Jason hasn't tried them yet. He was at the mall getting an Orange Julius while I was making dessert. I'm sure he'll try a bowl before he goes to bed though.


I washed and peeled the peaches (I used 6)
Here are my peaches (in the lemon/oil liquid) in a 9x13 pan.
Again I veered from the recipe and quartered my peaches.

Yummy cinnamon/brown sugar sauce

Sauce drizzled all over the peaches
Covered with foil and ready to pop into a 425 oven for 15 minutes
De-lish!


Martha Monday Assignment for 8/17/09: Map Coasters!

Sunday, August 9, 2009

Pink heart sugar cookies & a recipe...

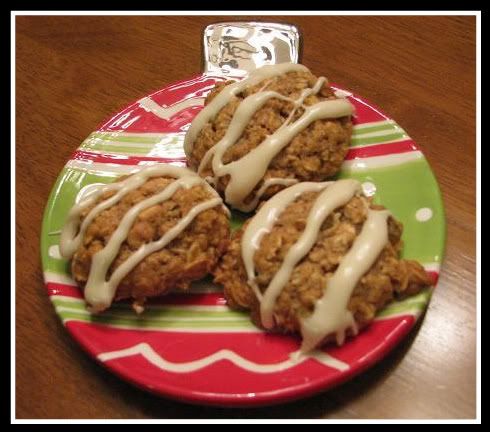
These cookies aren't just cute and delicious, they have a good dose of fiber in them for you more health-conscious people out there. With the substitution of whole wheat flour for part of the white flour and almond extract instead of vanilla, it's a nice variation of a traditional sugar cookie recipe.

Ingredients:
  • 1 cup unbleached all purpose white flour

  • 1/2 cup whole wheat flour

  • 1/2 teaspoon baking soda

  • 1/2 cup butter at room temperature

  • 1/2 cup granulated sugar

  • 1 egg

  • 1 teaspoon almond extract

Frosting (I never use exact measurements; I just eyeball it until the frosting is thick like peanut butter):

  • 2 cups powdered sugar

  • 3 tablespoons milk

  • 2 tablespoons butter

What to do:

  • Place 1 1/2 cups flour and baking soda in a small bowl and mix together until blended.

  • Place 1/2 cup butter and granulated sugar in large bowl and beat with electric mixer until blended. Add egg and almond extract and beat until blended. Add flour mixture and beat until well blended. Gather dough into a ball with your hands, wrap in plastic wrap, and refrigerate until firm (1 to 2 hours).

  • Preheat oven to 350 degrees.

  • Lightly flour a work surface. Unwrap dough, place on surface, and use a rolling pin to roll out to a thickness of approximately 1/4 inch. Cut out shapes with cookie cutters and place cookies about 1/2 inch apart on greased baking sheets. Bake for about 7 minutes, until cookies are golden brown. Cool cookies on a wire rack before frosting.

  • Put frosting ingredients together in small bowl and mix with a wire whisk or fork. Spread frosting on cooled cookies.

  • Makes approximately 18 cookies.

Enjoy!

Thursday, August 6, 2009

I'm Playing "Martha Mondays"


I've decided to expand my culinary/crafting skills by joining Martha Mondays (hosted by Brette at Martha and Me). I found out about it from Belle over at Muse in the Kitchen, who signed up herself and her husband Ward (he's the cook in the family) for the challenge. Shhh...she hasn't told him yet.

From Martha and Me: "Martha Mondays is a group of bloggers, Martha fans, home cooks, crafters, and people who want to cook or craft more who have joined together to cook or craft the same Martha dish or project. To get things started, I’ll choose a Martha recipe or craft (which must be from a current issue of Living or Everyday Food, The Martha Stewart Show or available on her site) and post a link (or page number in the mag if it’s not up on her site yet — if you don’t have the recipe or instructions for that week, just email me and I’ll send them to you – posting them on the web is a violation of Martha’s copyright). Everyone will then make the the dish or craft on the next Monday and post photos, comments or blog it within the following week. The idea is we will all be doing one project together on the same day, so there will be a kind of solidarity in this – plus we’ll get to see how everyone’s dish or craft turned out."

This week's assignment (8/10/09): Grilled Vanilla Peaches!

Tuesday, June 30, 2009

Yummy Chicken Salad Recipe...

This is the best chicken salad ever! It's the grapes that make it special. Everyone who has ever tried it loves it, including my kids. Feel free to alter it to your liking. I've listed some options below the recipe.

Chicken and Grapes Salad

  • Two 10 ounce cans chunk chicken breast in water drained

  • 1/2 cup Best Foods low fat mayo

  • 2 scallions (aka green onions) finally sliced

  • 2 small/medium (or 1 large) stalks celery finally diced

  • 1 1/2 cups seedless red grapes (cut each grape in half or in quarters if really big)
Mix everything together. Add fresh ground pepper and salt to taste. Voila! Makes 5 sandwiches.

Options:

  • use more or less celery, scallions and grapes to suit your taste

  • add chopped pecans or walnuts

  • full fat mayo, of course, can be substituted

  • I use Oroweat Double Fiber bread (4 grams of fiber in each slice), but it's really good on a croissant too.
  • Potluck idea: I buy a large plastic box of mini-sized croissants from my grocery store bakery section and take this to potlucks for a do-it-yourself sandwich bar. I pre-slice the croissants to make the sandwiches easier to prepare.


post signature

Wednesday, January 28, 2009

No-Guilt Superbowl Recipes

It's Super Bowl time! Here are some game day recipes that might possibly fool people into thinking they're eating completely fattening Super Bowl party foods.


De-Pudged Pigs in a Blanket

These flaky-licious hot dog treats taste almost exactly like the real ones. Juicy franks are wrapped in decadent dough and oven-baked for the flaky, buttery taste of the authentic hors d'oeuvre we all know and love! Go for it...

Ingredients:
1 fat-free (or nearly fat-free) hot dog (like the ones by Oscar Mayer, Hebrew National and Ball Park)
1 portion Pillsbury Reduced Fat Crescent roll dough

Directions:
Preheat oven to 375 degrees. Cut hot dog into 4 even pieces. Stretch or roll out the triangle-shaped dough slightly, to make it a larger triangle. Cut dough into 4 long, narrow triangles. Beginning at the base of each triangle, roll a piece of the hot dog up in the dough until the point of each triangle wraps around the center. Place dogs on an ungreased baking pan and cook for about 12 minutes (until dough appears slightly browned and crispy). Enjoy!

Serving Size: 4 pieces (entire recipe)
Calories: 135
Fat: 5g
Sodium: 645mg
Carbs: 15g
Fiber: 0g
Sugars: 3g
Protein: 7.5g


Ooey Gooey Chili Cheese Nachos

We love nachos. We know they're not always good for us, but they do taste great. The crunchy chips, the gooey cheese... Sometimes, we've just gotta have a nacho fix. Luckily, when we want to indulge our nacho cravings, we don't have to resort to gulping down insane amounts of calories and fat grams. This make-at-home nacho swap is WAY lower in calories than pretty much anything you can order in a restaurant, but it still tastes awesome!

Ingredients:
1 bag (7 oz.) Guiltless Gourmet Tortilla Chips, Yellow Corn flavor
1 package Boca Chili
4 oz. 8th Continent Light Vanilla Soymilk
3 oz. fat-free block cheddar cheese
2 oz. Velveeta made with 2% Milk
2 tbsp. fat-free cream cheese
2 tbsp. fat-free sour cream
3/4 cup Newman's Own All-Natural Bandito Salsa

Directions:
Melt all three cheeses in a saucepan with the soymilk; stir to combine. Prepare chili according to the directions on the box. Microwave chips until warm, and place on a large platter. Pour your low-fat cheese sauce all over your chips. Cover your chips with chili. Spoon salsa on top, along with a few dollops of fat-free sour cream, and, voila, there you have it! Makes 5 servings.

*Feel free to use other brands as desired. Nutritionals will vary.

Serving Size: 1/5th of recipe
Calories: 260
Fat: 4.5g
Sodium: 962mg
Carbs: 44g
Fiber: 6.5g
Sugars: 5g
Protein: 16g


Amazing Ate-Layer Dip

We're serious suckers for layers of cheesy, bean-packed, meaty stuff we can dip crisp veggies and baked chips into (yay!). This dip happens to be so delicious, that we've been wrapping it up in high-fiber tortillas and even eating it straight. And why stop at seven measly layers? We upped the ante, adding an eighth guilt-free layer to this fun fiesta food. Pay extra close attention to our most valuable layer (sorry, we had to!), spiced mashed butternut squash; it makes the perfect swap for refried beans.

Ingredients:
4 cups shredded lettuce
4 oz. fat-free sour cream
1 cup canned black beans; heated
10 oz. (about 2 and a 1/2 cups) butternut squash cubes
2 cups cherry tomatoes; chopped
1 cup diced onion
4 oz. roasted red peppers (not packed in oil); chopped
1 pouch (4 oz.) BOCA Ground Burger (or another ground meat substitute, like the Morningstar Farms version**)
1 oz. Galaxy Veggie Shreds, Cheddar (or another low-calorie cheddar cheese**)
3 and a 1/2 tsp. taco seasoning
Optional: lime juice, salt, and pepper

Directions:
Begin by combining half of the tomatoes with all of the onion. If desired, season to taste with salt, pepper, and lime juice; set aside. Next, nuke squash in a covered microwave-safe dish with 2 tbsp. water for 6 - 7 minutes (until squash is tender enough to mash). Using a fork or potato masher, mash squash to a pulp. Mix in 1 and a 1/2 tsp. of the taco seasoning and set aside. In a skillet sprayed with nonstick spray, combine Boca Ground Burger, tomatoes and the remaining 2 tsp. of taco seasoning and cook until crumbles are defrosted and mixture is thoroughly heated. In a large dish, layer ingredients in this order: lettuce, butternut squash mixture, tomato/onion mix, sour cream, black beans, "meat" mixture, cheese shreds, red peppers. Delicious served hot or cold! Makes approximately eight 1-cup servings!

Serving Size: 1/8th recipe; approx. 1 cup
Calories: 100
Fat: 1g
Sodium: 400mg
Carbs: 18g
Fiber: 4g
Sugars: 3.5g
Protein: 7g


Jalapeno Swappers

We love a challenge, and coming up with a rockin' swap for this cheesy fried finger food was slightly tricky. Luckily, our favorite fiber-packed cereal saved the day (as usual). BTW, if you've never tried fake-frying by baking items covered in low-calorie cereal crumbs, DO IT NOW!!! (Sorry, got carried away there.) HG Tip: Bake up a batch (or two - they'll go fast!) this Super Bowl Sunday, and you and your poppers will be the life of the party. Touchdown, HG!

Ingredients:
5 whole, fresh jalapenos
1/4 cup fat-free cream cheese
1/4 cup shredded fat-free cheddar cheese
1/2 cup Fiber One cereal
1/4 cup Egg Beaters, Original
Optional: salt, pepper and/or garlic powder

Directions:
Preheat oven to 350 degrees. Halve the jalapenos lengthwise, and remove the seeds, stems, and membranes (HG Heads Up: Be VERY careful when handling jalapenos; wash hands frequently and well, and avoid touching your face and eyes). Wash halves and dry them very well; set aside. Next, stir to combine cream cheese and cheese shreds. If desired, season cheese mixture with salt, pepper, and/or garlic powder. Using a blender, grind Fiber One to a breadcrumb-like consistency. If you like, season crumbs with salt, pepper, and/or garlic powder. Place crumbs in one small dish and Egg Beaters in another. Stuff each pepper half with cheese mixture. Next, carefully coat both sides of each pepper half with Egg Beaters, and then with Fiber One crumbs. Place peppers on a baking pan sprayed with nonstick spray, and place in oven. Cook for 25 minutes (for very spicy poppers) to 30 minutes (medium-hot poppers). Makes 10 poppers.

Serving Size: 5 poppers
Calories: 124
Fat: 1g
Sodium: 500mg
Carbs: 23g
Fiber: 8g
Sugars: 5g
Protein: 13g


Portabella Skins

Ingredients:
4 portabella mushrooms
1 tbsp. olive oil
1/4 tsp. salt
1/8 tsp. pepper
2/3 cup fat-free shredded cheddar cheese
2 slices turkey bacon; crisply cooked (with nonstick spray) and crumbled
1 small tomato; seeded and chopped
1 tbsp. minced fresh chives

Directions:
Preheat oven to 450. Line a baking sheet with foil and spray lightly with cooking spray; set aside. Wipe mushrooms clean with a moist paper towel; let dry. Brush mushroom caps and edges with oil. Sprinkle stem-side with salt and pepper and place, rounded side down, on baking sheet. Divide cheese among mushroom caps and bake 10 minutes, or until cheese begins to melt and edges begin to brown. Remove baking sheet from oven and sprinkle bacon, tomato and chives over mushrooms. Return baking sheet to oven and cook an additional 5 minutes, or until cheese is melted and mushrooms are hot. If desired, cut into wedges and serve with toothpicks. Serves 4. Recipe courtesy of the Mushroom Council and mushroominfo.com


Serving Size: 1 portabella
90 calories
5g fat
330mg sodium
6g carbs
1.5g fiber
2g sugars
6g protein

HG Tip! Watching your fat count closely? Use nonstick spray in place of the oil in this recipe, and each serving will have just 60 calories and 1.5g fat. Woohoo!


*All Recipes are from HungryGirl.com unless otherwise noted


Friday, October 31, 2008

Happy Halloween!

Roasting Pumpkin Seeds

When you're carving your Halloween pumpkins, don't throw away the seeds!

Roasted pumpkin seeds have a nutty flavor and are packed with protein and fiber. Pumpkin seeds are delicious toasted and salted, but they're even better flavored with sweet and savory spices.

How to Roast Pumpkin Seeds:

1. Rinse pumpkin seeds under cold water and pick out the pulp and strings. (This is easiest just after you've removed the seeds from the pumpkin, before the pulp has dried.)

2. Place the pumpkin seeds in a single layer on an oiled baking sheet, stirring to coat. If you prefer, omit the oil and coat with non-stick cooking spray.

3. Sprinkle with salt and bake at 325 degrees F until toasted, about 25 minutes, checking and stirring after 10 minutes.

4. Let cool and store in an air-tight container.

Why Carve Pumpkins?

The story of the Jack O'Lantern comes from Irish folklore. Jack was a crafty farmer who tricked the Devil into climbing a tall tree. When the Devil reached the highest branch, Jack carved a large cross in the trunk, making it impossible for the Devil to climb down. In exchange for help getting out of the tree, the Devil promised never to tempt Jack with evil again. When Jack died, he was turned away from Heaven for his sins and turned away from Hell because of his trickery. Condemned to wander the Earth without rest, Jack carved out one of his turnips, took an ember from the devil, and used it for a lantern to light his way. He became known as "Jack of the Lantern."

*Recipe from Allrecipes

Pictures of the Kids...

Cameron and Sierra before school on our porch

Sierra and her friend Hannah in front of Hannah's house

A little vignette in our foyer. I carved the pumpkin and Cameron made the junior pumpkin on the right.

Related Posts Plugin for WordPress, Blogger...

NO STEALING ZONE. . .

NO STEALING ZONE. . .
I like to share, but please don't use my blog content (pictures, text, anything) without asking permission. Thank you!