"Every act of creation is first of all an act of destruction.” ~ Pablo Picasso
I've dabbled in many types of crafty media over the years, but collaging is one of my favorites. However, I've never done it on this large a scale before.
Here are a few examples of my collage work using torn pre-printed paper, rubber stamping, heat embossing (do you see my signature gold bee on each item?), stickers, walnut ink, chalk, ephemera, buttons, beads, fibers, etc.
Below is a journal/scrapbook/photo album (can be used for whatever) I made for my daughter several years ago. I think she was around 8 or 9 (she's 14 now). Inside, I stamped a rainbow dragonfly and wrote. . .
To my daughter Sierra,
Follow your heart, dream big, always be yourself.
Love, Mommy
She still hasn't used it yet though. She says it's too pretty and she doesn't want to mess it up. Maybe when she's older and has children of her own, she'll put their photos in it. Who knows.

I made this book as a gift for a friend who was the out-going secretary of a club that I was going to be the new secretary for.

I made this bookmark for a friend who lives far away and was going to travel even farther away on vacation. I made it in the hopes that she would be able to use it while relaxing with a good book.

Flanking both sides of a mirror over my fireplace are two pieces of 20" x 20" art (I use the term art very loosely) that are very similar but different. I purchased them for lack of finding anything else to put in their place. I wasn't in love with them and always knew I'd find something else to replace them. They've been up for almost a year and I haven't found anything to take their place so I decided to make something myself utilizing what I already had.
This is what I started with. It looks like cheap hotel art. I can't believe I actually bought it (and its mate) and hung it up. I must have been desperate and had a temporary lapse in judgment.

My inspiration from a magazine.

The back side of the art.

I ripped off the paper backing.

Removed the many staples and the cardboard backing.

Removed the art that was taped in place and the glass. All that's left is the matte and frame, which I happen to think are very lovely and the only redeeming quality about the original art work.

My materials. The R and J I used for another wall art project (separate post coming soon).


I ended up selecting the French collage paper you see in the top left corner as my background.

Crafting is fun but can get messy. It's all part of the creative process.

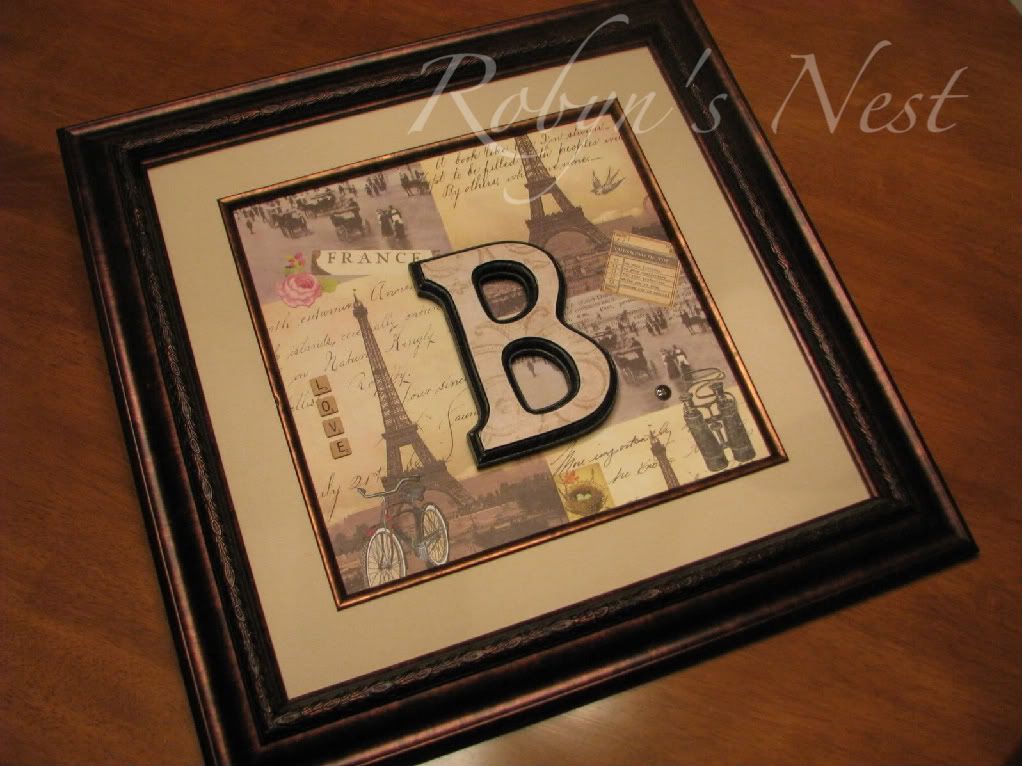
Here, I've got everything laid out and ready to glue down using Mod Podge. The letter "B" (for our last name) still needs to be painted and decorated with paper. In a separate post, I'll give a step-by-step tutorial on what how I accomplished that. Oh, I should mention that I used E6000 to attach the letter B and I re-attached the cardboard to the back for support using packing tape.

And this is the finished project below! I'm very pleased with how it turned out. It was one of those projects that I didn't have a clear vision for so I kind of made things up as I went along. Thank goodness I love the results.
I really want to show you how it looks now in its surroundings but I did another art project the same day for the wall space on the right side of the mirror that I want to share in a separate post. So I'll do the big reveal then.

Here's the list of things I added to further embellish the already collage-looking background paper:
- the pink rose near the word "France"
- the little flying bird in the top right near the Eiffel Tower
- the "love" scrabble letters
- the bicycle
- binoculars
- a little "thinking of you" note
- a dimensional black number 4 circle sticker (for the number of people in our family)
- and look at the sweet little robin's nest I found at The Graphics Fairy

Thanks for checking out my latest project. Don't forget to come back and see the wall art project I did for the wall space on the other side of the mirror. BTW, check out my comments section to see how little $$$ I spent on this project. I'm pretty sure you'll want to start looking around your own home for something to rip apart and reinvent.

Sharing at. . .
- Brag Monday at The Graphics Fairy
- Make it for Monday at Cottage Instincts
- Get Your Craft on Tuesday at Today's Creative Blog
- Tip Me Tuesday at Tip Junkie
- Anything Related Tuesday at All Thingz Related
- Tutorial Tuesday at Hope Studios
- Transformation Thursdays at The Shabby Chic Cottage
- Debbiedoo's Magazine Copy Cat Challenge
- Everything But the Kitchen Sink Thursday at A Little Knick Knack
- Frugal Friday at The Shabby Nest
- Show and Tell Friday at My Romantic Home
- It's a Hodgepodge Friday at It's a Hodgepodge Life
- Saturday is Crafty Day at Along for the Ride
- Marvelously Messy


